


Table of contents
- What is Unit Testing?
- Why Should You Care about Unit Testing?
- Do's and Don'ts of Unit Testing
- What are The Key Steps to Perform While Testing?
- How to Install JUnit Testing Framework
- How to Write the Unit Test
- How to Write Unit Tests with JUnit 5
- Java Unit Testing Tutorial
- Writing Java Unit Tests Automatically
- Testing for exceptions
- How to Create Mocks and Stubs for Testing
- Best Practices and Tips for Unit Testing in Java
- Keploy: The Best Java Testing Integration
- Conclusion
- Frequently Asked Question
Java unit testing is a process used by developers to test individual components of a Java application. It helps ensure that each piece of code, or unit, functions correctly on its own.
By isolating each unit and testing it independently, developers can identify and fix issues early, improving the overall quality of the application.
So, are you looking for the answer to the main question, how to execute Java unit testing?
Well, to execute Java unit testing, you have to typically use a testing framework like JUnit. First, write test cases that define the expected behaviour for a unit. Then, run these tests using the framework, which automatically checks if the unit's actual behaviour matches the expectations.
In this guide, you will find all the steps needed to conduct Java unit testing effectively, presented in an easy-to-understand manner without technical jargon.
What is Unit Testing?
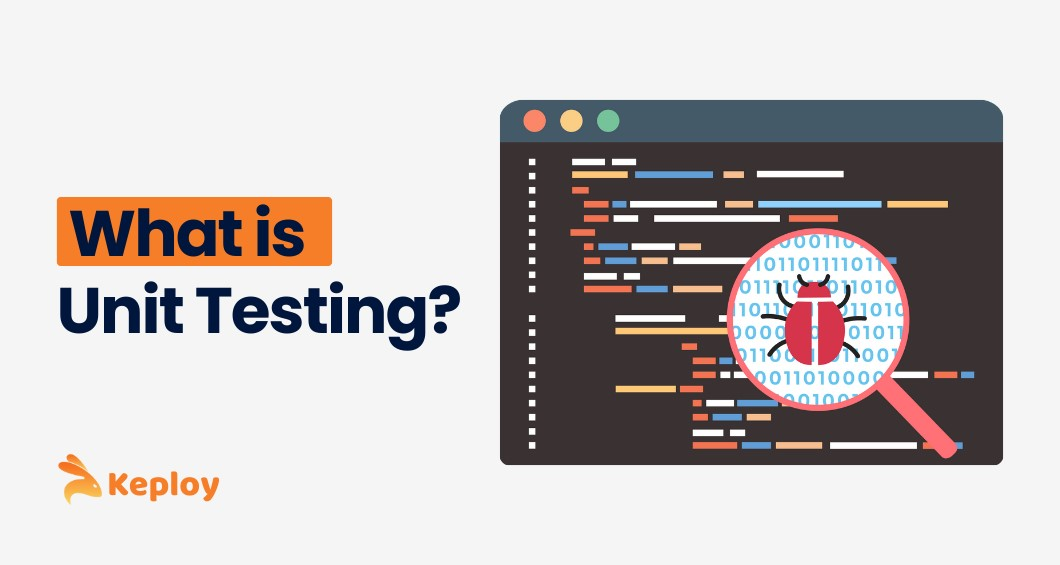
Unit testing involves independently testing individual units or components of software to ensure they function as intended. It focuses on the smallest testable parts of an application, such as functions, methods, or classes, to detect issues early and prevent them from impacting the larger system.
The main goal of unit testing is to test these units in isolation to ensure they do what they're supposed to do. It helps catch bugs and errors earlier in the development process, making it easier and less expensive to fix them.
Here's how it works:
Isolation: You focus on testing one unit of code at a time, ignoring the rest. This way, you know whether something goes wrong, it's likely within that specific unit.
Automation: You write small test cases that check whether your unit works as expected. Automating tests can save you time and effort.
Fast Feedback: Unit tests are quick to run, so you get instant feedback on whether your code is working or not.
Regression Prevention: When you update your code with new features or changes, doing these tests helps you make sure everything that worked before still works. It's a way to make sure the new stuff doesn't mess up the old stuff.
Why Should You Care about Unit Testing?
You should care about unit testing because it helps you in several important ways, such as:
Identifies Bugs Early: - Unit tests in your code help you spot and fix issues early on. This way, you handle problems when they're still small and easy to manage, which saves you time and avoids headaches later.
Ensures Reliability: - When you test each piece of your code to see if it works right, you end up with many well-tested parts. Put them all together, and you've got a program that's solid and less likely to crash or make errors.
Improves Code Quality: - Writing tests lets you think about how your code should work. This leads to cleaner, more organized, and better-documented code that's easier to understand and maintain.
Saves Time in the Long Run: - Yes, writing tests takes extra time, but it pays off. It reduces the time you spend fixing bugs and troubleshooting later in the development process.
Facilitates Collaboration: - Unit tests act as a kind of manual for your code. They help other developers understand how to use your code correctly. This makes collaboration smoother because everyone is on the same page.
Fearless Refactoring: - With unit tests in place, you can make changes or improvements to your code without worrying about breaking something else. The tests act as a safety net.
Documentation: - Unit tests also serve as living documentation for your codebase. They provide clear examples of how your code is intended to be used.
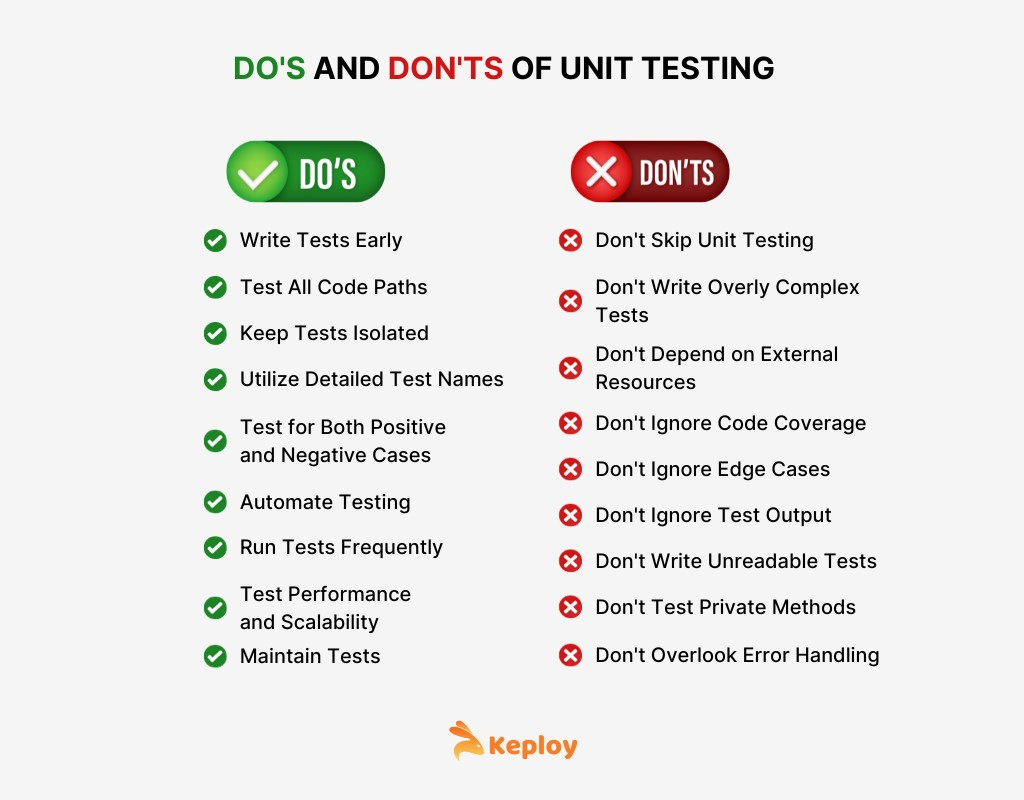
Do's and Don'ts of Unit Testing
What are The Key Steps to Perform While Testing?

Software testing is a critical part of the software development process, and it involves various steps to assure the quality and dependability of the software. Let’s check out the general procedures to perform while testing:
Test Planning
This initial phase involves defining the scope, objectives, and resources for testing. It includes creating a test strategy outlining what needs to be tested, the method of testing, and the schedule.
Test Design and Preparation
In this stage, you create test cases based on specifications and requirements. Set up test data and environments. If it fits, you prepare test scripts and scenarios for automated testing.
Test Execution
This phase is when the real testing happens. You run the test cases and check the software against what you expect to happen. Testers note down the results and any issues they find.
Defect Reporting and Tracking
When you find problems or defects while testing, put them into a defect tracking system and report them. These issues are then sorted by importance, assigned, and monitored to make sure the development team resolves them.
Regression Testing
Regression testing comes in once defects are fixed. It's to check that these fixes don't create new issues or affect already-existing codes that were already working. This type of testing helps keep the software stable.
Test Closure
This phase involves evaluating whether the testing goals and objectives have been met. A test summary report is prepared, which includes test results, test coverage, and other relevant metrics. The testing team assesses whether the software is ready for release.
How to Install JUnit Testing Framework
To install the JUnit testing framework, add the JUnit dependency to your 'pom.xml' file for Maven or 'build.gradle' for Gradle. Configure your build tool to recognize JUnit, enabling test execution. Refresh the project to seamlessly download and integrate JUnit for effective testing in your project.
Here is a detailed guide to install the JUnit testing framework:
Step 1: Set Up a Java Development Environment
Before using JUnit, you must have a Java Development Kit (JDK) installed on your system.
To install the Java Development Kit (JDK):
Download JDK: You can download and install the JDK from the official Oracle website or use an open-source alternative like OpenJDK.
Run Installer: Execute the downloaded file and follow the installation prompts. Choose the installation path if required.
Set Environment Variables: After installation, set the 'JAVA_HOME' environment variable to the JDK installation path, and update the 'Path' variable to include the JDK 'bin' folder.
Verify Installation: Open a command prompt or terminal and type java -version to confirm the installation.
Step 2: Create a Java Project
To use JUnit, you should have a Java project where you want to write and run your tests. You can create a new Java project in your preferred Integrated Development Environment (IDE) like Eclipse, IntelliJ IDEA, or Visual Studio Code.
Alternatively, if you prefer, you can also set up a Java project using command line commands.
Step 3: Download JUnit Jar Files
JUnit provides a set of JAR files that you need to include in your Java project to use its features. You can download the JUnit JAR files from the official JUnit website.
For JUnit 4, you can download the JAR files from the following links:
For JUnit 5, you can download the JAR files from the following links:
junit-platform-console-standalone.jar (for running tests from the command line): Download.
junit-jupiter-engine.jar (for JUnit 5): Download
Step 4: Add JUnit JAR Files to Your Project
Once you've downloaded the JUnit JAR files, add them to your Java project's build path. In most IDEs, you can do this by right-clicking on your project, selecting "Build Path" or "Libraries," and then adding the JAR files.
Step 5: Write and Run JUnit Tests
Now that you have JUnit set up in your project, you can start writing your tests. Create test classes with methods annotated with JUnit test annotations (e.g., ‘@Test’).
You can then run your tests using your IDE's test runner or from the command line using the JUnit console runner.
Example Test Class (JUnit 4):
import org.junit.Test;
import static org.junit.Assert.assertEquals;
public class MyTestClass {
@Test
 public void testAddition() {
 int result = 2 + 3;
 assertEquals(5, result);
 }
}
Example Test Class (JUnit 5):
import org.junit.jupiter.api.Test;
import static org.junit.jupiter.api.Assertions.assertEquals;
public class MyTestClass {
 @Test
 public void testAddition() {
 int result = 2 + 3;
 assertEquals(5, result);
 }
}
Once you've written your tests, you can run them to check the behaviour of your code.
That's it! You've installed JUnit and can now use it to write and run tests for your Java applications.
How to Write the Unit Test
To write a unit test, start by identifying the code unit to test (like a function). Create diverse test cases covering normal, edge, and error scenarios. Write test code to run the unit with specified inputs, validate the expected outcomes, and confirm that the code unit functions as intended by running the tests.
Here's a step-by-step guide on how to write unit tests:
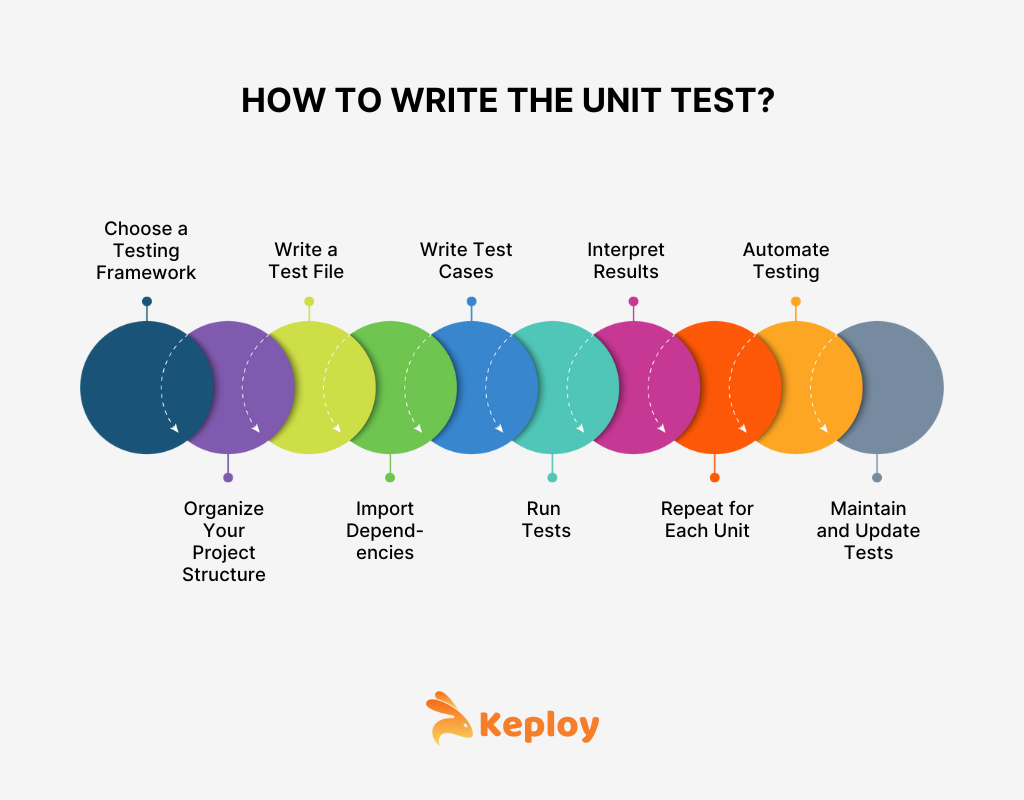
1. Choose a Testing Framework
Decide on a testing framework that suits your programming language and development environment. Common choices include:
Python: ‘unittest’, ‘pytest’
JavaScript: ‘Jest’, ‘Mocha’, ‘Jasmine’
Java: ‘JUnit’
C#: ‘NUnit’, ‘xUnit’
Ruby: ‘RSpec’
2. Organize Your Project Structure
Create a directory structure that separates your source code from your test code. Typically, you'll have a folder for source code (e.g., ‘src/’) and a folder for tests (e.g., ‘tests/’).
3. Write a Test File
Create a test file corresponding to the module or class you want to test. In many testing frameworks, the rule is to name this file with the same name as the module or class you are testing, appended with "_test" or "_spec" (e.g., ‘my_module_test.py’).
4. Import Dependencies
In your test file, import the necessary dependencies, including the testing framework itself and the module or class you want to test.
5. Write Test Cases
Write individual test cases that check specific aspects of your code's behavior. A test case typically consists of the following parts:
Arrange: Set up the necessary preconditions for the test.
Act: Invoke the method or function you want to test.
Assert: Check the output to ensure it matches the expected behavior.
Example (Python with ‘unittest’):
import unittest

from my_module import my_function

class TestMyFunction(unittest.TestCase):

 def test_my_function_with_valid_input(self):

 # Arrange
 input_data = 5
 expected_output = 10

 # Act
 result = my_function(input_data)

 # Assert
 self.assertEqual(result, expected_output)
 def test_my_function_with_invalid_input(self):

 # Arrange
 input_data = "invalid"

 # Act and Assert
 with self.assertRaises(ValueError):
 my_function(input_data)
6. Run Tests and Interpret Results
Use your chosen testing framework's command or interface to run the tests. This will execute all the test cases.
After running the tests, review the results. The testing framework will indicate which tests passed and which failed. Analyse and fix any failed tests.
7. Repeat for Each Unit
Repeat steps 3 to 7 for each module, class, or function you want to test. Ensure you cover various input scenarios, edge cases, and error conditions.
8. Automate Testing
Consider integrating the unit tests into your continuous integration (CI) pipeline to run tests whenever code changes are made automatically. This helps maintain code quality over time.
9. Maintain and Update Tests
As your codebase evolves, keep the unit tests up to date. Whenever you add new features or modify existing ones, update the corresponding tests to reflect the changes.
How to Write Unit Tests with JUnit 5
To write JUnit 5 unit tests, import the library, create a test class with '@Test' annotations, and use 'org.junit.jupiter.api.Assertions' for assertions. Employ '@BeforeEach', '@AfterEach', '@BeforeAll', and '@AfterAll' annotations for setup and teardown. Run tests in JUnit 5-compatible IDEs like IntelliJ IDEA or with tools like Maven.
Here's a step-by-step guide on how to write unit tests with JUnit 5:
Add JUnit 5 Dependency
To get started, you need to include the JUnit 5 library in your project. If you're using a build tool like Maven or Gradle, you can add the following dependency to your project's build file:
For Maven:
<dependency>
 <groupId>org.junit.jupiter</groupId>
 <artifactId>junit-jupiter-api</artifactId>
 <version>5.8.0</version> <!-- Use the latest version -->
 <scope>test</scope>
</dependency>
For Gradle:
testImplementation 'org.junit.jupiter:junit-jupiter-api:5.8.0' // Use the latest version
Write a Test Class
Create a new Java class that will contain your test methods. In JUnit 5, test classes do not need to extend a specific base class; instead, they use annotations to define test methods.
Write Test Methods
Create test methods within your test class and annotate them with ‘@Test’. JUnit will run these methods as individual test cases.
Example:
import org.junit.jupiter.api.Test;

public class MyMathUtilsTest {

 @Test
 public void testAddition() {
 int result = MyMathUtils.add(2, 3);
 assertEquals(5, result);
 }

 @Test
 public void testSubtraction() {
 int result = MyMathUtils.subtract(5, 3);
 assertEquals(2, result);
 }
}
Use Assertions
JUnit 5 provides a variety of assertion techniques in the org.junit.jupiter.api.Assertions class to check the expected outcomes of your tests. Common assertions include:
‘assertEquals(expected, actual)’: Check if two values are equal.
‘assertTrue(condition)’: Check if a given condition is true.
‘assertFalse(condition)’: Check if a given condition is false.
‘assertNotNull(object)’: Check if an object is not null.
‘assertNull(object)’: Check if an object is null.
Make sure to import the necessary assertion methods at the beginning of your test class.
import static org.junit.jupiter.api.Assertions.*;

// ... existing code

@Test
public void testAddition() {
 int result = MyMathUtils.add(2, 3);
 assertEquals(5, result);
}
Run Tests
You can run your JUnit 5 tests using your IDE's built-in test runner or through the command line using tools like Maven or Gradle. In most IDEs, you can right-click on the test class or method and select "Run" or "Debug."
View Test Results
After running the tests, you'll see the results in your IDE's test runner or the command line. JUnit 5 will report which tests passed and failed, along with any relevant information or error messages.
Repeat for Each Test Case
Continue writing test methods for each unit of code you want to test. Ensure you cover different scenarios, edge cases, and potential failure points.
Parameterized Tests (Optional)
JUnit 5 allows you to write parameterized tests, where you can run the same test method with multiple sets of inputs. This can be useful for testing a function with various input values.
import org.junit.jupiter.params.ParameterizedTest;
import org.junit.jupiter.params.provider.ValueSource;

@ParameterizedTest
@ValueSource(ints = {1, 2, 3, 4, 5})
public void testIsEven(int number) {
 assertTrue(MyMathUtils.isEven(number));
}
Repeat and Maintain
Continue to write and maintain the unit tests as your codebase evolves. Running tests regularly during development helps catch regressions and ensures the reliability of your code.
Java Unit Testing Tutorial
In this video tutorial series, you will find the fundamentals of unit testing in Java, helping you become proficient in writing effective and reliable tests for your Java applications.
Link: Java unit testing tutorial
Writing Java Unit Tests Automatically
You can automate the writing of Java unit tests through various tools and libraries that generate test code.
Automatic test generation can be an effective addition to your testing strategy, as it helps ensure that your code is thoroughly tested and can save you time.
Here are a few approaches and tools for automatically generating Java unit tests:
1. JUnit Test Generators
There are tools and IDE plugins available that can generate JUnit test code for your Java classes automatically. Here are some examples:
Eclipse: If you are using the Eclipse IDE, you can use the built-in "JUnit Test Case" wizard to generate JUnit test skeletons for your Java classes automatically. Simply right-click on your class, select "New" > "JUnit Test Case," and follow the wizard.
IntelliJ IDEA: IntelliJ IDEA offers similar functionality for generating JUnit tests. You can use the "Generate" menu to create JUnit test methods for your Java classes. Simply right-click on a class, select "Generate," and choose "Test."
These tools can generate test methods with basic assertions based on your class's methods and fields. However, you'll often need to customize the generated tests to cover specific scenarios and edge cases.
2. JaCoCo and Mutation Testing
JaCoCo is a popular code coverage tool for Java. It can be combined with mutation testing tools like Pitest to automatically generate and evaluate test cases.
Mutation testing introduces small, intentional defects (mutations) into your code and checks whether your tests can detect these mutations. If a mutation is not detected by your tests, it indicates a gap in your test coverage.
To set up mutation testing with JaCoCo and Pitest, you must configure your build tool (e.g., Maven or Gradle) to include the necessary plugins and dependencies.
The process can be a bit more involved than basic test generation but is highly effective at improving test coverage.
3. Property-Based Testing
Property-based testing libraries like QuickCheck for Java or JUnit-Quickcheck can automatically generate a large number of test cases based on properties or specifications you define. These tools are particularly useful for testing complex or data-driven code.
Here's an example of property-based testing with JUnit-Quickcheck:
import com.pholser.junit.quickcheck.Property;
import com.pholser.junit.quickcheck.runner.JUnitQuickcheck;
import org.junit.runner.RunWith;

@RunWith(JUnitQuickcheck.class)
public class MathPropertiesTest {
 @Property
 public void additionIsCommutative(int a, int b) {
 assert (a + b) == (b + a);
 }
}
Property-based testing libraries will generate a large number of test cases with various inputs to verify that the property holds.
4. Code Generation Tools
Some code generation tools, such as Lombok, can help simplify the creation of getter and setter methods in Java classes. While not focused on test generation, they can indirectly reduce the amount of boilerplate code you need to write in your tests.
5. Custom Code Generators
If your project has specific testing requirements, you can develop custom code generators to create test cases automatically.
These generators can use templates and reflection to create test cases based on your classes' structure and annotations. Tools like Apache Velocity can help generate code from templates.
Testing for exceptions
In JUnit, you can test for exceptions in a few different ways:
1. Using assertThrows() (JUnit 5 and above):
This is the preferred and most readable way to test for exceptions in modern JUnit versions. The assertThrows() method takes the expected exception type and a lambda expression that should throw the exception. It returns the thrown exception, which you can use for further assertions.
import static org.junit.jupiter.api.Assertions.assertThrows;

@Test
void testDivisionByZero() {
    Exception exception = assertThrows(ArithmeticException.class, () -> {
        int result = 10 / 0;
    });

    assertEquals("/ by zero", exception.getMessage());
}
Using
@Test(expected = ...)(JUnit 4 and above):
This is a simpler approach, but it only verifies that the expected exception was thrown. It doesn't allow you to assert the exception message or other details.
import org.junit.Test;

@Test(expected = ArithmeticException.class)
public void testDivisionByZero() {
    int result = 10 / 0;
}
Using try-catch (JUnit 4 and above):
This method is useful when you need to perform additional assertions based on the exception's details.
import org.junit.Test;
import static org.junit.Assert.fail;

@Test
public void testDivisionByZero() {
    try {
        int result = 10 / 0;
        fail("Expected an ArithmeticException to be thrown");
    } catch (ArithmeticException e) {
        assertEquals("/ by zero", e.getMessage());
    }
}
How to Create Mocks and Stubs for Testing
To create mocks and stubs for testing, use a mocking framework like Mockito or Sinon.js to simulate the behavior of external dependencies or components. Mocks are objects that emulate the behavior of real objects, while stubs are used to control the behavior of specific functions or methods during testing by returning predefined values or triggering specific actions.
Here's a comprehensive guide on how you can create mocks and stubs for testing:
Understand the Concepts
Stub
A stub is a simplified implementation of an interface or class that provides predetermined responses to method calls. Stubs are used to simulate the behavior of external components or dependencies.
Mock
A mock is similar to a stub but goes a step further. It provides predetermined responses and allows you to set expectations and verify that certain methods were called with specific arguments.
Mocks are used to ensure that your code interacts correctly with its dependencies.
Choose a Testing Framework
Most programming languages have testing frameworks that include tools for creating mocks and stubs.
However, some popular testing frameworks include JUnit for Java, NUnit for .NET, and Jest for JavaScript. These frameworks often provide built-in support for creating mocks and stubs.
Select a Mocking Library
In addition to testing frameworks, you may need to choose a mocking library or tool that complements your chosen framework. Examples include Mockito for Java, Moq for .NET, and Jest's mocking capabilities for JavaScript.
Create Stubs
To create a stub, you typically need to create a class or object that implements the interface or extends the class you want to stub. In the methods of the stub, provide predetermined responses or data.
Here's an example in Java using Mockito:
// Interface to be stubbed

public interface DataService {
 int fetchData();
}

// Stub implementation

public class DataServiceStub implements DataService {
 @Override
 public int fetchData() {
 return 42; // Predetermined response
 }
}
Create Mocks
To create a mock, use the mocking library's functions to generate an instance of a class or interface that you want to mock. You can then set expectations for method calls and verify them later. Here's an example using Mockito in Java:
// Create a mock
DataService dataServiceMock = Mockito.mock(DataService.class);

// Set expectations for method calls
Mockito.when(dataServiceMock.fetchData()).thenReturn(42);

// Perform your code under test that uses dataServiceMock
// ...
// Verify method calls

Mockito.verify(dataServiceMock).fetchData();
Inject Stubs or Mocks
In your test code, replace the actual dependencies with the stubs or mocks. This can be done using constructor injection, setter injection, or any appropriate dependency injection mechanism.
Ensure that your code under test uses the stubs or mocks instead of the real dependencies during testing.
Write Test Cases
Write test cases for your code under test, using the stubs or mocks to control the behavior of external dependencies. Verify that your code behaves correctly based on the expected responses and interactions with the stubs or mocks.
Run Tests
Run the unit tests using your testing framework and take a look at the results. Make sure that your code passes these tests and acts as it should when it interacts with the mocks and stubs.
Refine and Iterate
Improve your tests when needed, adding more cases to cover different situations. Keep tweaking both your code and tests to make sure they're on-point and dependable.
Best Practices and Tips for Unit Testing in Java
Unit testing in Java is a crucial practice to ensure the reliability, maintainability, and correctness of your code. Here are some JavaScript unit testing best practices:
AAA Pattern: Follow the Arrange, Act, assert pattern to set up the test environment, execute the method, and verify results using testing frameworks like JUnit or TestNG.
Single Responsibility: Test one functionality per unit test to maintain clarity and pinpoint issues effectively.
Descriptive Method Names: Use clear and descriptive test method names to improve readability and understanding of test results.
Keep Tests Focused: Write concise, focused test cases, avoiding unnecessary complexity for easier maintenance and debugging.
Dependency Injection: Employ dependency injection to decouple code from external resources, facilitating the use of mocks or stubs for testing.
Edge Cases and Boundaries: Test not just typical scenarios but also edge cases, wrong inputs, and boundary conditions.
Isolation with Mocks: Isolate unit tests from external dependencies using mocks or stubs to ensure determinism and speed.
Keploy: The Best Java Testing Integration

Keploy is a free-to-use, developer-focused backend testing application designed to simplify and enhance the efficiency of backend testing for engineers. It stands out due to its user-friendly, strong, and scalable nature.
The primary function of Keploy is to create mocks/stubs of the data and test cases by monitoring API requests and database queries. This process is based on user traffic, significantly accelerating release cycles and improving reliability.
Keploy's approach to generating test cases and mocks/stubs from actual API calls and database queries makes it an effective tool for Java unit testing. In Java unit testing, the goal is to test individual units of source code to validate that each unit performs as expected.
This can enhance this process by:
Automating Test Case Generation: - Automatically generating test cases from real user interactions can save time and ensure that the tests are representative of actual use cases.
Creating Realistic Data Mocks/Stubs: - By capturing real API calls and DB queries, Keploy can create more accurate and realistic mocks/stubs, which are crucial for effective unit testing in Java.
Speeding Up Test Development: - Reducing the time spent on writing and maintaining test cases allows Java developers to focus more on feature development and less on test creation.
Enhancing Test Reliability: - Tests created based on real user data can potentially cover more edge cases, leading to more solid and reliable Java applications.
Integration with Java Unit Testing
Integrating Keploy into Junit, that can enhance the testing process significantly. Here's how it can be integrated:
Set Up Keploy
Install Keploy on your development environment (Windows, Linux, or macOS).
Record API Calls and DB Queries
Use Keploy to record the API calls and database queries during normal application usage. This data will form the basis of your test cases.
Keploy will automatically generate test cases based on the recorded data. These test cases will be specific to the Java components interacting with the backend.
Integrate with Java Testing Frameworks
Incorporate the generated test cases and mocks/stubs into your existing Java testing frameworks (like JUnit or TestNG), using Keploy Java SDK
Execute the tests within your Java environment, analyse the results, and refine them as needed to cover more scenarios or handle edge cases better.
Conclusion
To sum it up, this guide has covered all the essential aspects of Java unit testing. We've walked you through the fundamentals, demonstrating how to write effective test cases.
By following the principles and techniques outlined, you'll be able to write and test strong, error-free Java applications. However, remember, unit testing isn't just a practice—it's a fundamental method that can save you time, prevent bugs, and ultimately lead to more efficient and successful software development.
So, apply what you've learned here to your Java projects to have the benefits of thorough and effective unit testing.
Frequently Asked Question
How to make the most out of Java unit tests?
To make the most out of Java unit tests, focus on thorough test coverage, use meaningful test case names, and regularly update tests as your code evolves.
How do you write a basic unit test in Java?
A basic unit test in Java is written using JUnit or TestNG, where you define a test method annotated with @Test and use assertions to check expected outcomes.
Can unit tests check for exceptions in Java?
In Java, unit tests are capable of checking for exceptions. Using testing frameworks like JUnit, you can write assertions that verify whether a method throws the expected exception under specific conditions.